Tutorial
This document may need to be fleshed out a bit better but this should serve as an outline.
Initial Setup
- You should make sure you have BPS installed, running, and tested as described in Installation.
- As mentioned in the Introduction, you will need a float on which you can tow your GPS.
- Set your GPS tracking on and make sure the interval is short. I set mine to log position once every 4 seconds.
- Make sure your GPS datum is set to WGS84. That tends to be the default setting but you should make sure. You can use a different datum but you should make sure that the configuration file is set to match. See Configuring BPS.
- Set the logging interval on your depth sensor. It needs to be particularly short if you are free diving. I set mine to log every 2 seconds.
- Attach depth sensor to something. I generally attach it to the camera housing. I may need to compensate for the fact that the camera is usually a meter or so above the bottom when I take the photos but that seems preferable to getting the logger full of sediment.
Clock Synchronization
Since BPS will use time codes to find positions and/or depths for each photo it is essential that relevant clocks are all in sync. Before getting in the water, make sure your camera’s clock is set to the correct local time. It’s easiest to use the time display on your GPS for this purpose. The Panasonic Lumix DMC-TS4 that I use has a built in GPS that is supposed to be able to set the camera’s clock to GPS time. If you use this feature make sure to double check it. There camera clock should match the GPS clock within about a second. The depth logger actually sets the time codes when the log is downloaded from the logger. Therefore, the computer that you use to download the depth log needs to have its clock synced to GPS time when the file is downloaded. If your computer’s clock is set by the internet, this is usually good enough (in my experience) but you should double check.
While in the Water
Regardless of whether you are on SCUBA or free diving, you should pause for a few seconds before taking a photo and pull down lightly on the rope you have attached to your GPS float. To get the best possible accuracy, you need the float to be directly over you. Pausing at the bottom will also minimize the effect of any clock synchronization problems for both depth and position. Also, don’t drown. That’s bad for data collection.
Back on the Surface
If you’re using a Garmin GPS60 like I am, do not save the active track. Saving the track and then downloading the saved track gets rid of the timestamp on each position rendering it useless as far as BPS is concerned. Instead, you want to download the active track. I use GPSbabel to download the track and convert it to a GPX file. Many newer GPS models output GPX files without the need for conversion. You just need to make sure you’re getting a GPX file that has a timestamp for each point within the track.
You should make backups of your photos before letting BPS operate on them. I’ve never had a problem but, since BPS is writing to part of the jpeg file, there is a possibility that it could corrupt the photo so you should have a backup.
For convenience, I keep my BPS GPS logs in benthic_photo_survey/data/GPS and my depth logs in benthic_photo_survey/data/sensus. For photos, I create a directory for each set of photos within benthic_photo_survey/data/images. BPS is set up to operate on a directory of photos as a unit. For instance, when creating a shapefile all photos within the currently loaded directory will become a point in the shapefile.
Configuring BPS
At some point I’d like to add a graphical interface for configuring BPS but, for now, you’ll have to edit configuration.py in a text editor. There are explanatory comments in the file and it should be fairly straight forward.
You’ll want to set LOCAL_TIME_ZONE to the time zone you’re collecting data in. You’ll probably also want to change the list of habitats and the list of substrates. Just read the comments in the code.
If you are deploying more than one camera / gps / depth logger set up at a time, you will need to take precautions to avoid confusion. You will need to change the db_path in configuration.py and keep the logs from the two setups separate. For the sake of this tutorial, let’s assume you’re only using one setup at a time.
Using BPS
- Launch BPS by navigating to the bps_package directory and typing: python bps_gui.py in the command line. Some windows installations will require that you just type bps_gui.py. If you installed bps with git, bps_package directory will be benthic_photo_survey/bps_package relative to wherever you put it.
- Load your GPS file. Select ‘Load GPS Log’ from the file menu, select your GPX file and click ‘Open’. This will load the positions and time stamps into a database specified in configuration.py.
- Load your depth log. Select ‘Load Depth Log’ from the file menu. This step is optional but it will load depths and temperature readings from the depth log into the database specified in configuration.py.
- Load your photos. Select ‘Load Photos’ from the file menu and chose the directory that contains the photos you would like to tag and use to create a shapefile.
- You can now use the ‘Next’ and ‘Previous’ buttons (or the arrow keys on your keyboard) to scroll through your photos. You can tag the photos one at a time with Depth and Temperature or location using the buttons at the bottom of the application or you can use the items in the ‘Actions’ menu to tag all the loaded photos with location or depth and temperature. Either way, you’ll see the assigned attributes in the ‘Exif Data’ area on the right side of the application window.
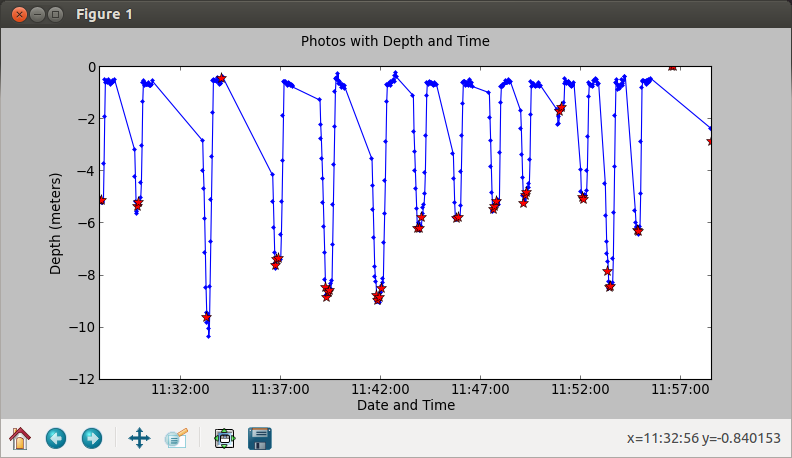
- You can choose ‘Depth Plot’ from the ‘Output’ menu. This will use Matplotlib to render a graph of the depth log for the loaded photos with stars that represent where each photo was taken. This plot is particularly useful for data that has been collected while free diving. You can verify that the clocks were adequately synced by making sure that the photos were taken at the deepest parts of the dives.
- Export a shapefile using the ‘Output’ menu. This shapefile can be viewed using most GIS software. I generally use QGIS.